
Updated January 17, 2020
There is a problem (opportunity if you’re a glass half full person) lurking in the heart of every piece of needlepoint. It catches new stitchers and old, it can make a modern edgy piece look “needlepointy” and dull. And it cannot be avoided.
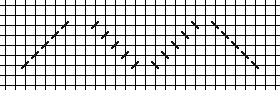
Tent Stitches, the basic needlepoint stitch, are asymetrical. They have a direction, like little arrows. If you have done cross stitch in the past, it doesn’t have this problem (cross stitches are squares). The asymmetry of needlepoint sneaks up and surprises many stitchers. You can’t get a curve to look even, a line that slants the wrong way becomes a dotted line. You can see the difference in the picture below.
Older needlepoint that was done entirely in Tent Stitch didn’t worry about this problem, so modern needlepoint that has the problem tends to look dated. Today we go for a more realistic line and more elaborate stitches.
This problem drives me mad, because I like symmetry in my needlepoint. And I’ve found several ways to solve it, two of which you can see in the four-leaf clover above. The first method, seen on the leaves, is to change the slant of the stitch. If the slant of the line matches the slant of the stitch, the line will be solid. If they are opposite, the line will look dotted. I changed the slant at each of the black lines, making the white line of the clover solid all around. The black line meant that the two slants didn’t meet, but I have done that as well; your eye tends not to see the change if you either use a soft thread or make the center stitch a cross stitch, or both.
I further reinforced the symmetry of the white lines by having all the other stitches above and below it slant the same way. This made the whole clover nicely reflective.
The other method is to use Whipped Stitches to make curved lines. Whipping is the process of wrapping an existing line of stitches with the same or another thread. Begin by making the line. To do thin whipped lines, use Backstitch. Two adjacent lines of backstitch make a slightly thicker line and chain stitch, used here, makes a bold line.
Wrap the stitch by beginning at one end of the line, going over the first stitch and under the second, repeating this over-under process until the line ids wrapped. Magically the line curves and looks smooth.

About Janet M Perry
Janet Perry is the Internet's leading authority on needlepoint. She designs, teaches and writes, getting raves from her fans for her innovative techniques, extensive knowledge and generous teaching style. A leading writer of stitch guides, she blogs here and lives on an island in the northeast corner of the SF Bay with her family
Leave a Reply